User Map Calibration in TopoFusion Pro
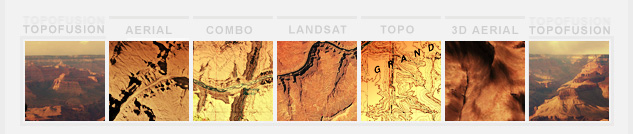
TopoFusion's user map feature allows you to import, calibrate and display your own maps. Maps can then be used trace trails/roads, generate elevation profiles, and all the other base TopoFusion features.Note: Pro Only - User maps are only available in TopoFusion Pro.
To open the User Map Library, go to Window->User Map Library, from the main TopoFusion window. This opens the dialog shown below, which lists all currently calibrated maps in your library. User maps can be located anywhere on your hard drive. The name and path to each map is shown.
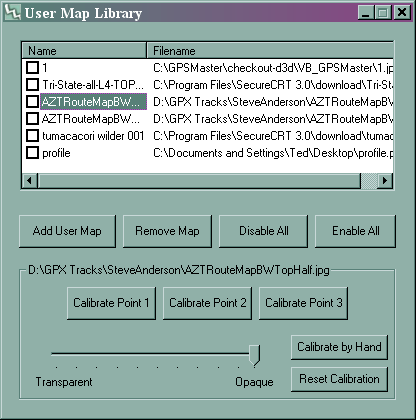
Supported images - Currently Jpeg (.JPG), PNG (.png) and BMP (.bmp) formats can be imported. We are working on adding support for other formats.
Adding a user map - To add a user map to your library, click the "Add User Map" button. A standard windows dialog comes up, allowing you to find the file on your hard drive. Click open when you are finished.
The selected file is opened, added to the list of user maps, and displayed on the current map view. It is given a default calibration that covers the majority of your current view. For this reason, it can be a good idea to first zoom/pan so that the area shown in TopoFusion roughly covers the area of your user map.
Adjusting transparency - The lower portion of the user map dialog is now active for your new user map. You can adjust the transparency of the map using the slider bar, from transparent to opaque (solid). Using a semi-transparent map is very useful in determining correct calibration using USGS topos and aerials provided by TopoFusion.
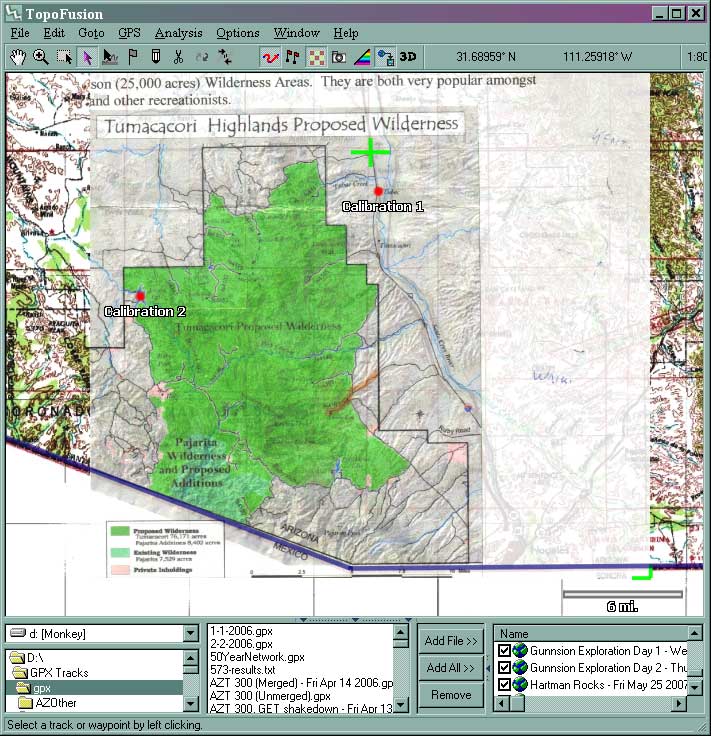
Screen shot of TopoFusion displaying a user map with calibration points
Calibrating Maps by hand - When the user map was added, it was given two default calibration points, set to the upper left corner and lower right corner of the current map view. You can adjust these calibration points using the mouse. Click on the "Calibrate by Hand" button. A box comes up informing you that you can also adjust calibration points using the "Select Points" mouse mode, available on the tool bar.
Calibration points are highlighted in red on the upper left and lower right corners of the user map. Left clicking on one will select it. Left click and hold down the mouse button to adjust it. You can also click on the bright green cross in the middle of the map. Left clicking and holding down the mouse button will move the entire map (all calibration points) based on your mouse movement.
Setting Calibration Points - For more advanced calibration, you can set your own calibration points. The basic idea is to click on a point on your user map, then click on the corresponding point in the "real world". The real world, in this case, is a point in TopoFusion, usually on a USGS topo or aerial map.
To set a calibration point, use one of the three "Calibrate Point" buttons. It is advisable to start with point one, then two, then three.
Two versus Three point calibration - Many maps can be calibrated using only two points. The map is assumed to be north up, and of a compatible projection (TopoFusion base maps are generally WGS-84). The two calibration points simply determine the position in the real world and the width and height of the map. You should first try calibrating with only two points. Adding a third calibration point does not necessarily make the calibration "better." In fact, if your calibration points are not exact, it may actually make it worse. In general, you will only need three calibration points if you your map needs to be rotated, skewed, or sheared.
Calibrate Point X - After hitting one of the "Calibrate Point" buttons, the mouse mode changes to "Select Point" and a message "Select Calibration point on user map" is displayed. The user map is shown in the map window, stretched so that it is taking up much of the current display. This is simply for convenience of finding your calibration point -- the actual calibration has not been changed. You can zoom and pan around on the user map to more precisely find a suitable calibration point (generally a road/trail intersection or other obvious feature). One trick here is to hold down the Control key to switch temporarily to the Pan mouse mode. (This trick works in other mouse modes) Releasing the Control key goes back to the select point tool that you should use to click your calibration point. Left clicking chooses the calibration point on the user map.
After choosing the point, the user map will disappear completely, and the message "Select corresponding point on topo, aerial or satellite map" is displayed. You now need to left click on your calibration points actual coordinates in TopoFusion. Again you can pan and zoom the map (using the Control key if necessary) before clicking your point. If you are having trouble finding this point, or need to define it more precisely, you can first add a waypoint at the calibration point, then simply click on the waypoint. A waypoint can also be used if you wish to enter the coordinates of your calibration point, rather than clicking it on the map. Once the waypoint is displayed on the map (it can be in any open file), you simply click on the waypoint on this second stage of the calibration.
With the new calibration point set, the user map is now displayed. If this was your first calibration point the map may be in a strange state. Don't worry, just go on to the second calibration point -- Remember that when you need to click on the user map again it will be stretched to fit the screen.
Canceling and resetting calibration - If you make a mistake and don't want to lose your current calibration at any time, you can click on the "Cancel Calibration" button (each calibration button changes into a cancel button while you are calibrating). Also, if you wish to start over, for whatever reason, you can use the "Reset Calibration" button to return the user map to the default calibration (taking up most of the current map view).
Choosing good calibration points A few tips:
- Choose points as far away from each other as possible, preferrably in opposite corners of the map.
- For 3 point calibration do not choose points that are colinear (along a straight line). This makes the calibration very prone to error.
- Often it's hard to click the mouse exactly where you want it. It's easy to adjust points afterwards using the "calibrate by hand" function. Note that you can only adjust the real world coordinates of the calibration point. To change the image coordinates (on your user maps) you'll need to redo the calibration. If this doesn't make sense, it will once you go to manual calibration and move the point around.
- All calibrations are automatically saved when you exit TopoFusion. Map state is saved and will be restored the next time you load the program.
- Zoom to map - Double clicking on a user map in the list of user maps will zoom/pan the current map view to show the map. If the map is disabled, it will also enable it so it's visible.
- The checkboxes next to each user map can be used to toggle on and off display of the map. One note - if a map is unchecked the image will not be loaded upon start up. If you are not using a particular user map it is best to leave it unchecked so it isn't loaded upon start up (important for very large images).
- The "Remove Map" button removes the user map from the library. All calibration will be lost, so only use this if you truly wish to not use the map anymore!
- Disable all and Enable all are self-explanatory.
- HELP I can't find my map, no matter how I calibrate it! - Make sure the transparency slider is set to "opaque." At fully transparent it is completely invisible.