Uploading GPS tracks to your GPS using TopoFusion
eTrex 10/20/30, Oregon, Dakota, Montana, Colorado
This page covers the Garmin Oregon, Dakota and Colorado family of units. For other GPS models, go to the main tutorial index page.All uploaded tracks are stored in the "GPS Drive:\Garmin\GPX\" Directory on the GPS. The limit for a single GPX file is 10,000 points and you can store 200 individual tracks.
Note that these units can also upload massive amounts of GPX data in the form of Custom Raster Maps, as uploaded by TopoFusion. This is often the easiest way to upload a bunch of GPX data, and as a bonus you can overlay it on any of TopoFusion's available imagery. For more on this, see our tutorial on uploading TopoFusion maps to your GPS.
Step #1 - Check the number of points.

If the track has more than 10,000 points, you will need to simplify it first. If you have zero points there is something wrong with your file -- try downloading the file again and making sure the extension is GPX. If you have less than 10,000 points, you can skip step #2.
Step #2 - Simplify to 10,000 points.
In the "hand" / pan mouse tool mode, right click on the GPS track in the map window. A context menu pops up that looks like this:
Choose the "Simplify/split/spline track" option.
The simplify/split dialog:
Change the number of points to 10000. Hit "OK" on the dialog box. Your track is now 10,000 points.
Step #3 Upload the track.
Go to the GPS menu in the main TopoFusion window.
Select the "Upload Track(s)" option.
Choose the file you want to upload in the dropdown selection at the top.
Leave the secondary option as "to Saved Tracks / Courses."
Now hit "Begin" to begin transfer. It should only take a few moments.
Alternatively, you can simply copy a GPX file from anywhere on your computer into the "Garmin Drive:\Garmin\GPX" directory when your GPS is plugged in.
Step #4 - Verify the upload.
Unplug the GPS and turn it on. Go to "Track Manager" from the Main Menu. (note: do not go to "Tracks" from the "Find" function)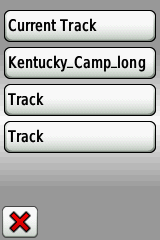
Select your uploaded file (note that it may be called 'Track' if the track itself doesn't have a name attribute). Choose "View Map." The resulting map should correspond to the GPS track in TopoFusion.
Step #5 - Enable the track or Navigate it
In order to display the course on the GPS's map screen you need to enable it. Go to "Track Manager" and select your uploaded file. Choose "Show On Map" to turn it on (newly uploaded files are not shown by default).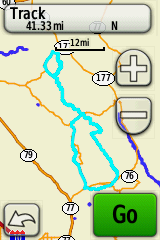
Alternatively, you can navigate the track by hitting the large green "GO" button when you do "View Map" on a track. This enabled the new track navigating features (such as profile previews, low/high point readout, etc).