Exporting TopoFusion Maps to Garmin Units
This tutorial describes the process of exporting any of TopoFusion's maps to Garmin GPS units (currently Oregon, Dakota and Colorado support this feature).
Basics
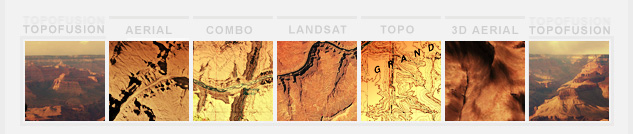
The feature is found in the "Export View" dialog in TopoFusion. Go to "File->Export View" to open it.Maps are saved in the .KMZ (google earth) format.
KMZ files placed in the [GPS drive]:\Garmin\CustomMaps directory will show up on the GPS.
Choosing an area
The Export View function will export maps for the area currently visible in TopoFusion's map view. What you see is what you get. Pan and zoom the map view to show the area you wish to export.Tip - holding down the CTRL key while pushing the '+' and '-' (zoom in/out) keys, or while scrolling the mouse wheel, allows for very small adjustments to the zoom level.
Exporting maps

Select the checkbox for "Export KMZ to Garmin GPS." The options below it are now enabled.
There are two ways to export maps -- tiled and untiled. Due to the GPS limit of 1MP on a map size, the largest untiled map you should export is 1024x1024 pixels. Untiled exports are useful for small areas, and for true "what you see is what you get."
Luckily TopoFusion lets you export large areas of maps using the Tiled KMZ Export. Select the checkbox next to "Tiled KMZ for specific map type" to enable it.
The tiled export works by letting you choose a TopoFusion tileset in the dropdown. The export map will cover the current map view with tiles at 1:1 resolution. The key thing to note here is that the GPS is limited to 100 map tiles at a time. Pay attention to the "Number of 1000x1000 maps" number to see how many tiles it takes to cover the current map view with the tileset you have selected. If over 100, you will either need to select a larger scale tileset (e.g. go from Topo 2M to Topo 4M) or zoom in on the map to cover less area. The number of tiles display will recalculate as you zoom or change tileset.
Tip - Remember that besides the underlying base tileset, everything shown in TopoFusion will be a part of your KMZ export. That means all visible tracks, waypoints and even User Calibrated Maps will show up.
Once you are ready, hit the "Export" button at the bottom of the dialog. If your GPS is connected to your computer, and you have a "CustomMaps" directory on your GPS, TopoFusion will find it and the "save as..." dialog will start in that directory. Otherwise you can save .KMZ exports anywhere on your hard drive, for future reference or backup.
Once you have chosen a filename, TopoFusion begins exporting the map. If necessary, TopoFusion will download missing maps, updating on the status at the bottom of the dialog.
You're done! You can check the resulting .KMZ file by opening it up in Google Earth. Or, unplug the GPS and check it out there!
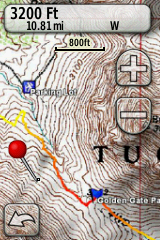
Tips for using Custom Maps on the Dakota/Oregon/Colorado units:
 1) Update your firmware.
2) With your GPS plugged into your computer, create a directory called "CustomMaps" in the "Garmin" sub directory on either your GPS itself, or the SD card. Map images in the .KMZ (google earth tile) placed in either CustomMaps directory will be automatically loaded by the GPS.
3) Use TopoFusion -- it has the ability create large scale KMZ files from any of the available imagery in the software. That includes 24k topos and high res color aerials for most of the country. You can also add your own custom maps to TopoFusion and upload those. Just use the "File->Export View" command to get started.
4) Use the custom maps feature to upload tracks, too. Anything that is displayed in TopoFusion gets rendered and put into the custom map. That means you can have hundreds of GPX tracks loaded and they will all show up on the GPS. No more simplifying and splitting of tracks, worrying about whether it'll all fit or not.
I have found this to be extremely useful. I can load up (or draw) several tracks in an area, change their colors/widths, and then get them all very easily onto my GPS, laid over a highly detailed basemap.
This is hands down the best way to get a GPS network onto a GPS for use in the field.
5) Use Topo 4M. I've found that the white background on Topo 4M makes the map more readable than the Garmin vector basemap (e.g. Topo 2008 DVD).
In addition I recommend 4M to cover more area (than Topo 2M) and also so that tracks you have loaded end up thicker and easier to see. You may want to add additional thickness to your tracks by right clicking on them in the map and choosing "Track Properties."
6) Aerial photographs are cool, but harder to see. I definitely get a kick out of passing a big building and seeing what it looks like from the top, but aerials tend to be a little dark and tough to read outside on the Dakota and Oregon screens.
7) Draw Order - there is an input box on TopoFusion's Export View function to control the draw order parameter. Higher numbered maps will be drawn on top of lower ones. This is useful if you are using multiple KMZ map files on your GPS. Also, the number 50 is a magic number -- maps with a draw order less than 50 will show beneath (through) any Garmin mapsource vector maps you have on the GPS. 50 and higher will show on top of the vector data.
8) Remember that you can only have 100 map tiles on your GPS at a time. TF will give you a warning message if you generate a single KMZ file with more than 100 tiles (the number is displayed as you zoom in and out and choose a tileset as well). But even across multiple KMZ files you can only have 100 tiles total across the entire GPS. So, be careful.
9) You can use Google Earth to preview the generated KMZ file and see what you have. It will look less pixelated on the GPS since Google Earth resamples the map tiles and loses some quality. Still useful to verify what you have.